How to add Width Options to custom layouts in Drupal 8 & 9
The layout builder lets users change the way their content is presented. There was some projects in Drupal 7 which were similar to layout builder, but it was never as effective, or as user friendly like the Layout API. The layout, when set up, can affect a content type globally, or user can change layout per node.
The layout builder can be used in two ways. You can use it to create a layout for each content type on your site and you can also use it to create a layout for each individual piece of content.
in this tuto I'll show you how to add Width Options to custom layouts in Drupal 8 & 9.
Create Custom Module
Go ahead and create a custom module called mymodule.
If you use Drush, just run the following command and fill in the prompts.
drush generate module
NOTE: The generate command only works in Drush 9 and up.
Or, you can do it the old fashion way.
1. Create a folder in modules/custom/mymodule.
2. Create a mymodule.info.yml file and add the following into it:
name: My Module
type: module
description: The description.
package: Custom
core: 8.x
core_version_requirement: ^8 || ^9
3. Create a mymodule.module file. This file is not required in Drupal 8 and above, but we’ll need it for later.
Create Custom Layout
The custom layout will allow users to add any blocks into 1 to 12 columns using layout builder.
1. Create a mymodule.layouts.yml. In this file you define your custom layouts. Add the following into it:
custom_layout_bootstrap:
  label: 'Custom Layout'
  path: layouts/custom_layout_bootstrap
  template: custom--layout--bootstrap
  class: '\Drupal\mymodule\Plugin\Layout\CustomBootstrapLayout'
  category: 'Custom'
  default_region: content
  icon_map:
    - [content]
  regions:
    content:
      label: Content
2. Create the following file in the module layouts/custom_layout_bootstrap/custom--layout--bootstrap.html.twig. You’ll need to create a layouts and custom_layout_bootstrap directory.
Add the following Twig code:
{% if content %}
  <div{{ attributes }}>
    {% if content.content %}
      <div {{ region_attributes.content.addClass('layout__region', 'row') }}>
        {{ content.content }}
      </div>
    {% endif %}
  </div>
{% endif %}
Create a file called CustomBootstrapLayout.php at the path src/Plugin/Layout. Add the following:
<?php

namespace Drupal\mymodule\Plugin\Layout;

use Drupal\layout_builder\Plugin\Layout\MultiWidthLayoutBase;

/**
 * Class CustomBootstrapLayout
 * @package Drupal\mymodule\Plugin\Layout
 */
class CustomBootstrapLayout extends MultiWidthLayoutBase {

  /**
   * {@inheritdoc}
   */
  protected function getWidthOptions() {
    return [
      '1-col' => '1 column',
      '2-col' => '2 column',
      '3-col' => '3 column',
      '4-col' => '4 column',
      '6-col' => '6 column',
      '12-col' => '12 column',
    ];
  }

  public function build(array $regions) {
    foreach ($this->getPluginDefinition()->getRegionNames() as $region_name) {
      if (array_key_exists($region_name, $regions)) {
        foreach ($regions[$region_name] as $uuid => $block) {
          // add class to block
          $regions[$region_name][$uuid]['#attributes']['class'][] = $this->getColumnWidth();
        }
      }
    }

    return parent::build($regions);
  }

  protected function getColumnWidth() {
    $col = [
      '1-col' => 'col-12',
      '2-col' => 'col-6',
      '3-col' => 'col-4',
      '4-col' => 'col-3',
      '6-col' => 'col-2',
      '12-col' => 'col',
    ];

    return $col[$this->configuration['column_widths']];
  }

}
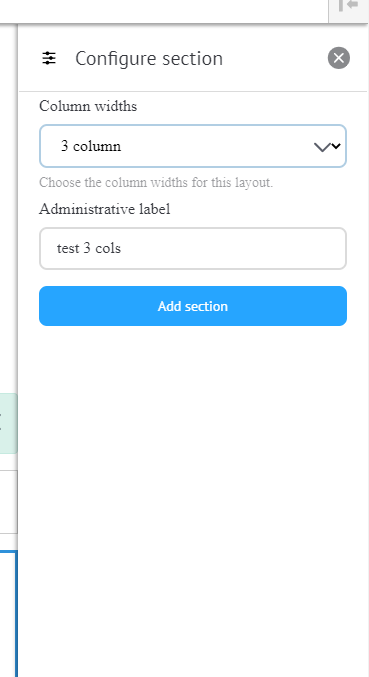
The getWidthOptions() method is used to populate the get “Column widths” drop-down when you configure a section.
The getColumnWidth() method is used to determine the Bootstrap column widths depending on the selection from the drop-down. The returned value from this method is just a Bootstrap class.
Then we override the build() method to add the classes to the inline blocks.
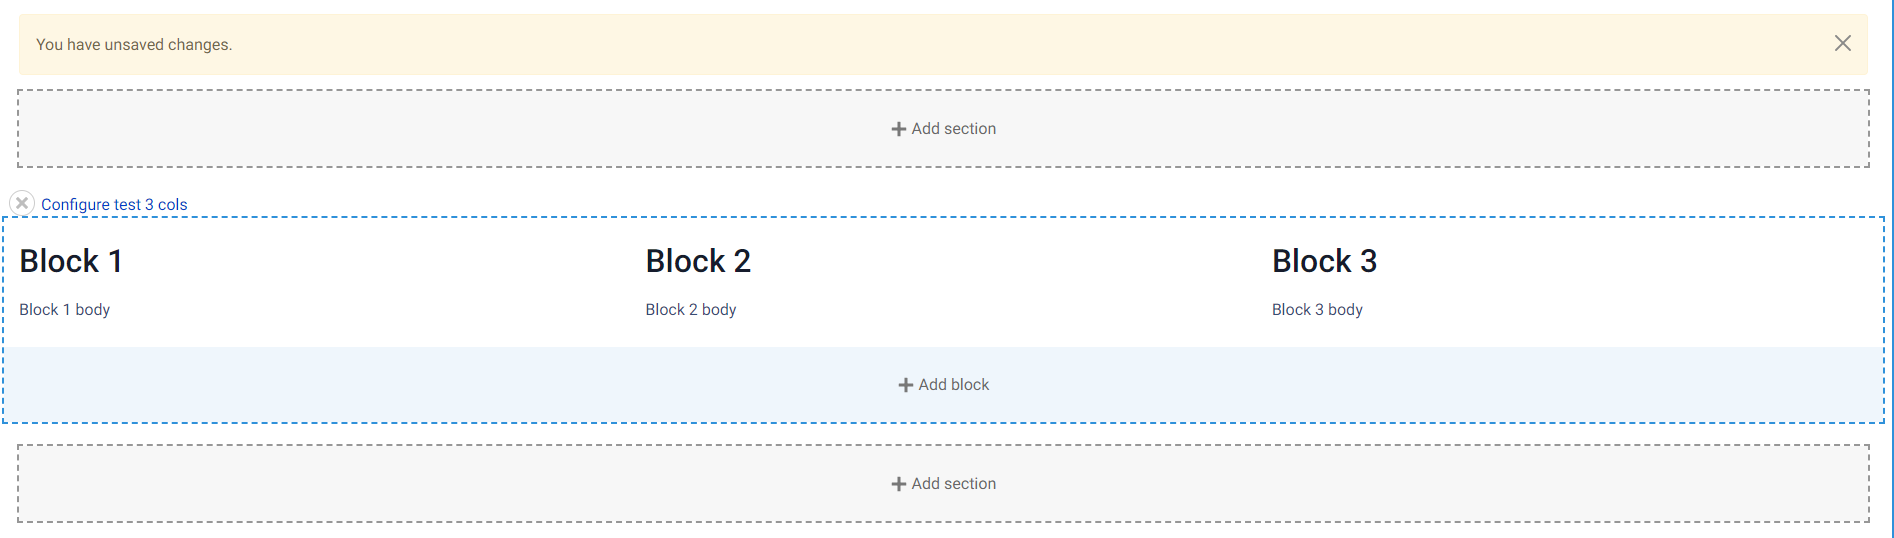
How to use this Layout
Go and edit a layout and click on “Add section” and you should see the “Custom Layout” layout on the right.
Select the column option then click on “Add section”.
Finally any block added into the section will be displayed as the selected column width.